This tutorial is for those who are looking for blogger to WordPress migration. This is not the easiest way to switch from blogger to WordPress, but this is definitely worth trying if you have huge traffic and want to switch from blogger to WordPress with zero downtime.
That is blogger hosted blog(Custom domain or blogspot.com) to free WordPress.org script on a self hosted hosting.
If you are still using blogspot url without custom domain. Just refer this section only Tutorial for blogspot.com sub domain users. You guys don't need to follow everything.
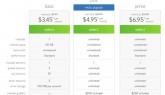
Before starting blogger to WordPress migration make sure that you bought a web hosting for your website. You can try bluehost web hosting for your blog. It is one of the reputed web hosting service provider with lots of features and products. Read more about bluehost hosting.
Contact us for hosting offers with free blogger to WordPress migration service. Email to [email protected]
I tried this method number of times. In this method your blog will not face any downtime and will give minimum 404 urls.
Steps for Blogger to WordPress Migration
- Creating a temporary WordPress blog
- Setting up your newly created blog
- Importing contents from blogger blog to new temporary blog
- Switch from temporary blog to original blog
- Changing Name Servers
- Search and replace temporary urls.
- Redirecting search pages, labels, pages, archivs, and feed pages
- Tutorial for blogspot.com sub domain users
Where ever you see yourdomain.com or example.com, it just refers to your own domain.
1, Creating a temporary WordPress blog
Do not change DNS Records or Name Servers before completing first 4 steps.
This is something that you won't read in any other blogger to WordPress migration articles. Temp blog is a sub domain of main domain where we will keep contents of blogger blog for a small duration and will delete it once we are done with migration.
* If yourdomain.com is main domain beta.yourdomain.com is a sub domain which is free to create in most of hosting services.
Creating temporary sub domain
This step may be slightly different for web hosting services. Lets create a sub domain using bluehost cpanel. Remember we are using bluehost hosting cpanel as an example.

In hosting section click cpanel and access sub domains section as shown above.
For a single domain hosting service you should add this sub domain(beta.yourdomain.com) to public_html folder as shown below.
For a multi domain hosting you should point that sub domain(beta.yourdomain.com) to root of domain from drop down list. First find out root of that domain and do it so. It may be like this public_html/yourdomain and you should be very careful if you are using multi domain hosting to avoid loosing data of your existing root domain.
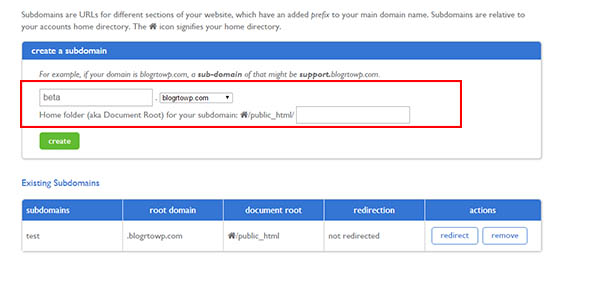
We just kept it as blank after pulic_html/. What ever it is that sub domain should point towards the root of same domain. If you have any doubt in this section you can add it as comment.
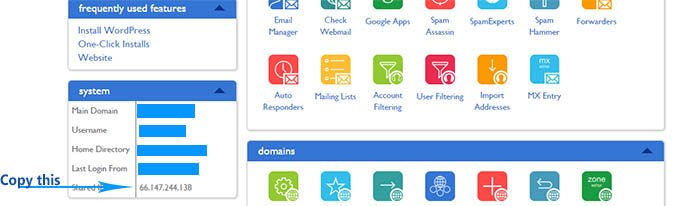
Add a new a record to existing domain host.
So login to domain host(domain service provider) and add a A record pointing towards the web hosting service ip address. Lets get IP address first. In most of the cases you will get IP address of your hosting during their first signup email. Or you can get it from cpanel as well. Here it is sidebar of bluehost cpanel.
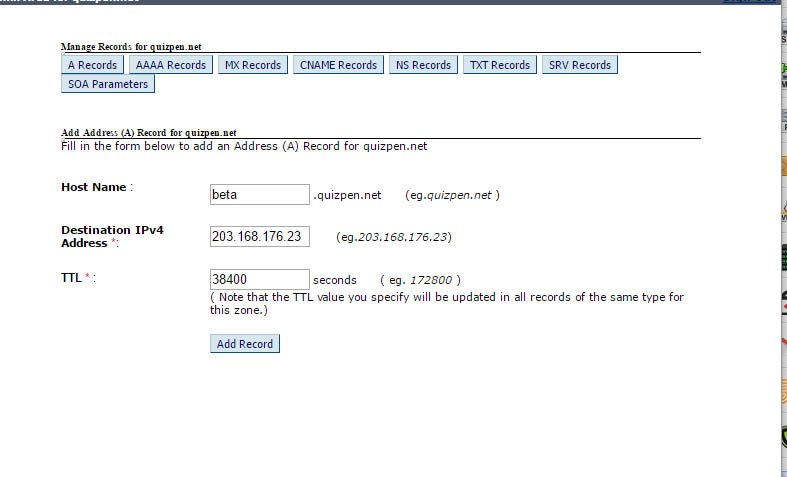
Now we have IP address eg: 203.168.176.23, login to domain account and add a "A record" with name "beta" pointing towards "203.168.176.23 (IP Address of web hosting)"
Here it is an example screenshot showing adding a record.
Take beta.yourdomain.com(replace yourdomain.com with your domain name) in browser. You might see a directory or a default webpage of hosting. Sometimes it may take time to show up due to delay in dns propagation. So lets wait sometime.
Installing WordPress
Now you should install WordPress in that sub domain. WordPress installation is pretty simple and a cake walk using single click install scripts.
Read Start a new WordPress blog for detailed installation steps. You should install WordPress in that sub domain beta.yourdomain.com. As I already wrote detailed installation instructions in that tutorial, here it is some screenshots of installation wizard.
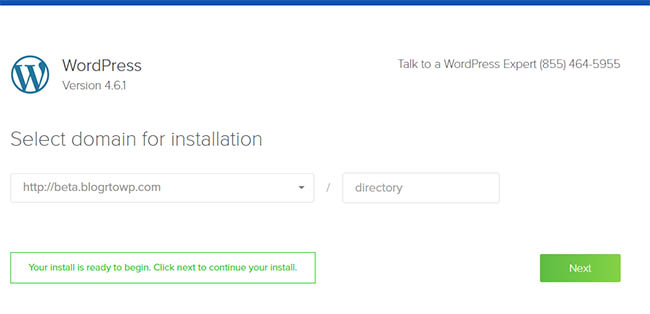
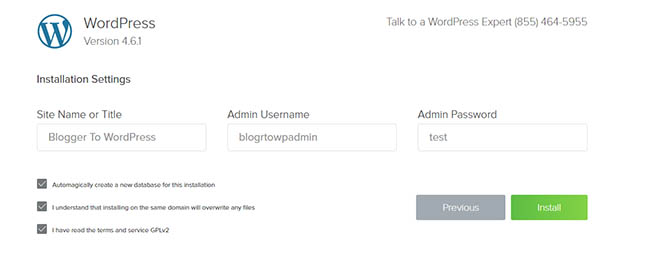
That is it, you will get notification once installation is complete.
2, Setting up your newly created blog
In this step we are going to make some changes to new WordPress blog. Login to WordPress using temporary blog admin panel. beta.yourdomain.com/wp-admin/
Change permalink structure to match with blogger blog default url structure. Navigate as shown below
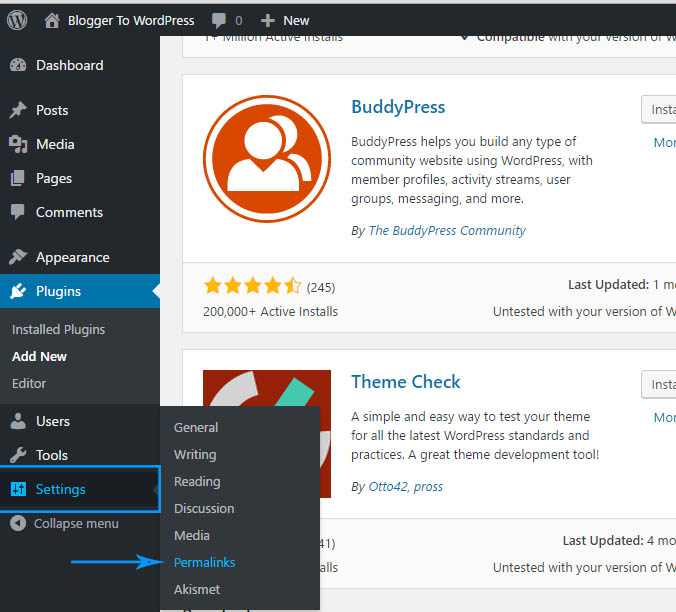
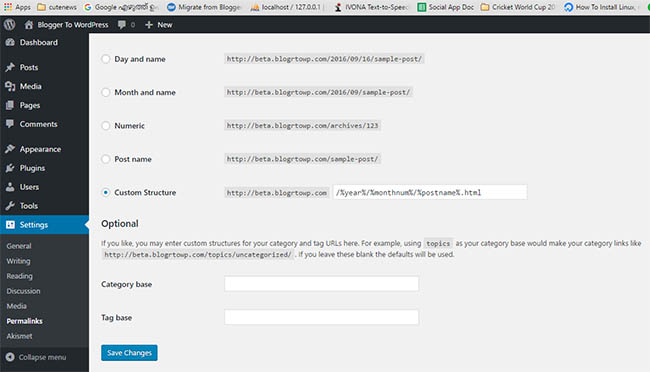
and change permalink structure as shown below
/%year%/%monthnum%/%postname%.html
And also delete default post and page added automatically during installation.
You can add a new WordPress theme or other changes to your site. Genesis framework and themeforest are great market places to find premium WordPress themes. You can also add necessary plugins for your blog. If you are done with design and setting of your blog. Start Importing content from blogger blog.
3, Importing contents from blogger blog to new temporary blog
This is not a difficult task. There is a dedicated plugin to import content from a blogger blog to WordPress.
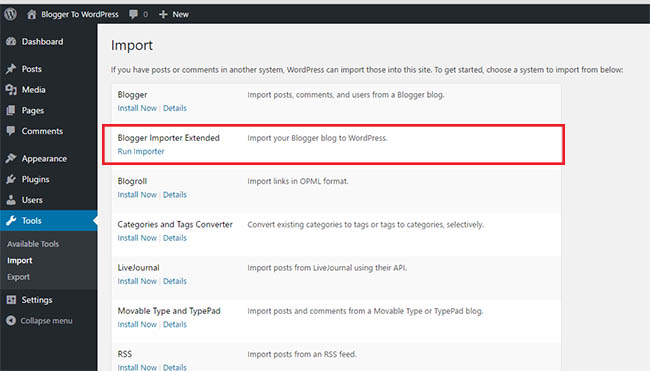
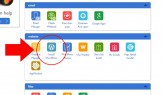
From plugin section of WordPress add new plugin named "Blogger Importer Extended (https://wordpress.org/plugins/blogger-importer-extended/)". This plugin will help us to keep the urls exactly like that in a blogger blog.
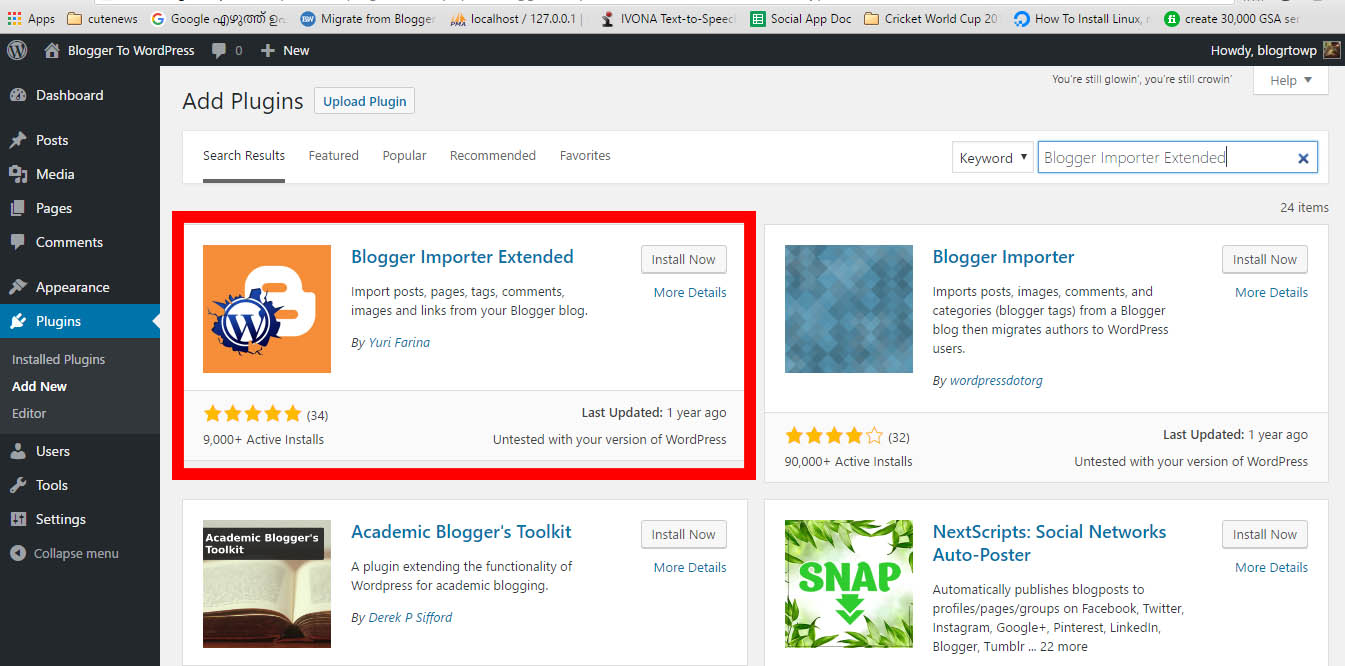
Plugin marked in red color is the one that I am talking about. Install this plugin and activate it.
Then from import menu on left side take Run importer as shown in below given image.
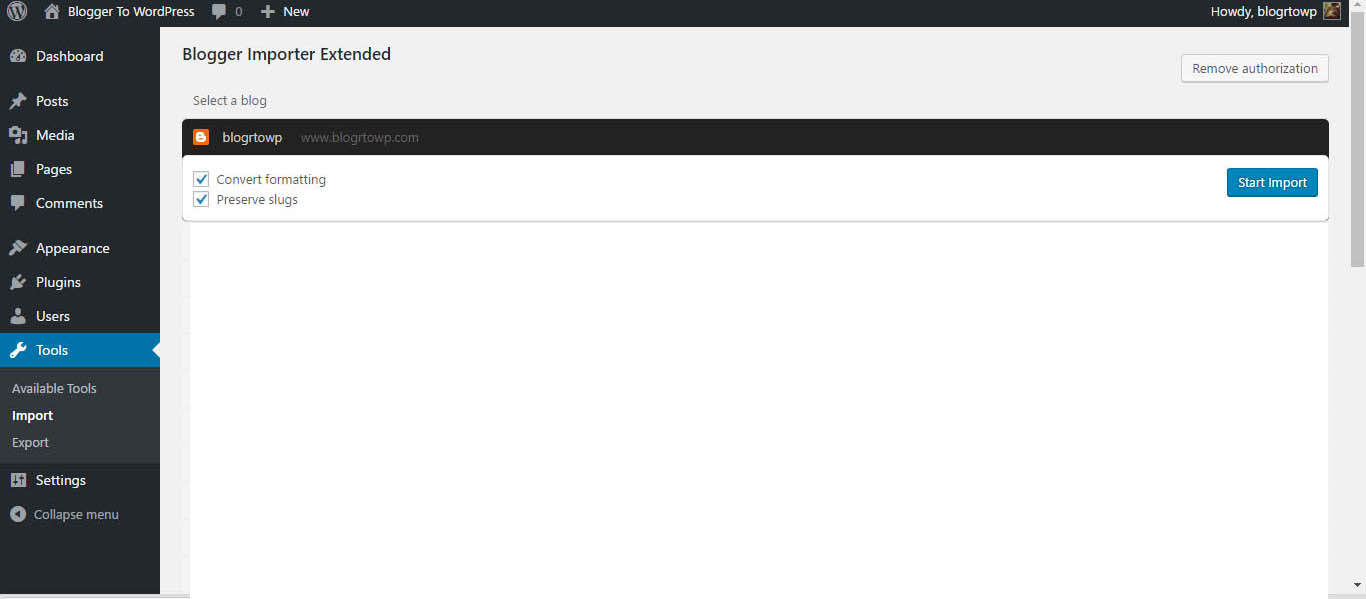
This will ask you to authorize using a google account where your blog is hosted. Authorize this to google and select blog as shown below.

After authorization it will show available blogs in your blogger account. Select the blog and continue.

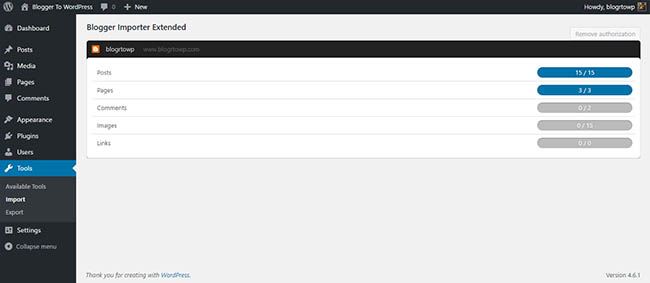
After clicking start import button it will start importing contents. It may take some time depending upon the number of posts and images that you have in your blog.
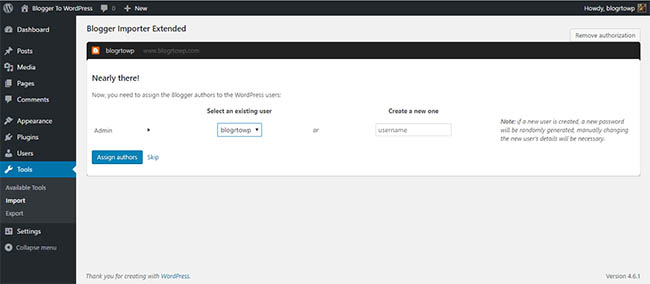
In last step you can create either a new admin or assign to an existing admin.
After completing import, cross check some posts url and make sure everything is good. And check example.com and beta.example.com. They must be a copy of one another content wise.
We are going to do next step. Which will make you inaccessible your new blog for a small time and it will also give beta.example.com a 404 error page or a bad layout. So don't worry about it and just complete this step and change name servers which is given by hosting service provider.
4, Switch from temporary blog to original blog
After this step you no longer will be able to see WordPress admin panel, but will be accessible after next step. So complete all above steps before doing this step.
Navigate to general settings in WordPress admin panel. There you will see WordPress Address (URL) and Site Address (URL). Which is named like beta.yourdomain.com. Change both those names to www.yourdomain.com and click save. Both urls should change at the same time. Now you will see a 404 page of your blogger blog.
5, Changing Name Servers
Now it is the right time to change Name Servers in your domain registrar admin panel. If you are using bluehost hosting, your name servers might look like these, ns1.bluehost.com and ns2.bluehost.com. Now login to domain registrar and change name servers as shown below. 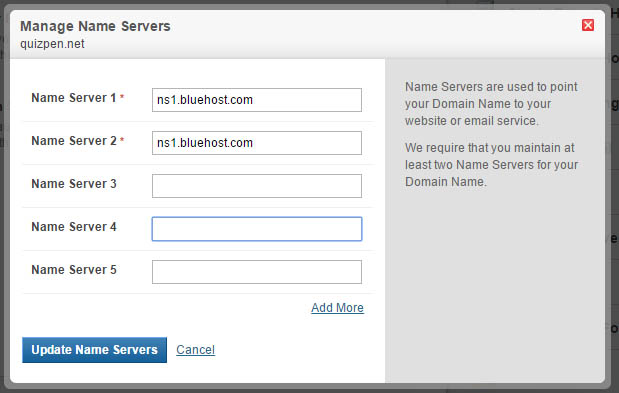
Above settings are host dependent, so check with web hosting to get name servers. If you have any doubt about adding name servers. Just make a quick search "Change name servers in godaddy or change name servers in namecheap". You will find number of articles related to that.
If you are done with changing name servers, wait 3 to 4 hours. And check www.yourdomain.com, if it is showing your new WordPress blog just continue to next step. Otherwise wait until DNS changes to take effect after changing name servers.
6, Search and replace temporary urls.
So now your new WordPress blog is live, login to WordPress admin panel (www.yourdomain.com/wp-admin/). Add a new WordPress plugin named Search & Replace https://wordpress.org/plugins/search-and-replace/. Install this plugin and activate it to continue.
This WordPress plugin will help us to do search and replace entire database of our WordPress site. It will really help us take backup of database file.
So first take a backup of existing database as precautionary measure before playing with it.
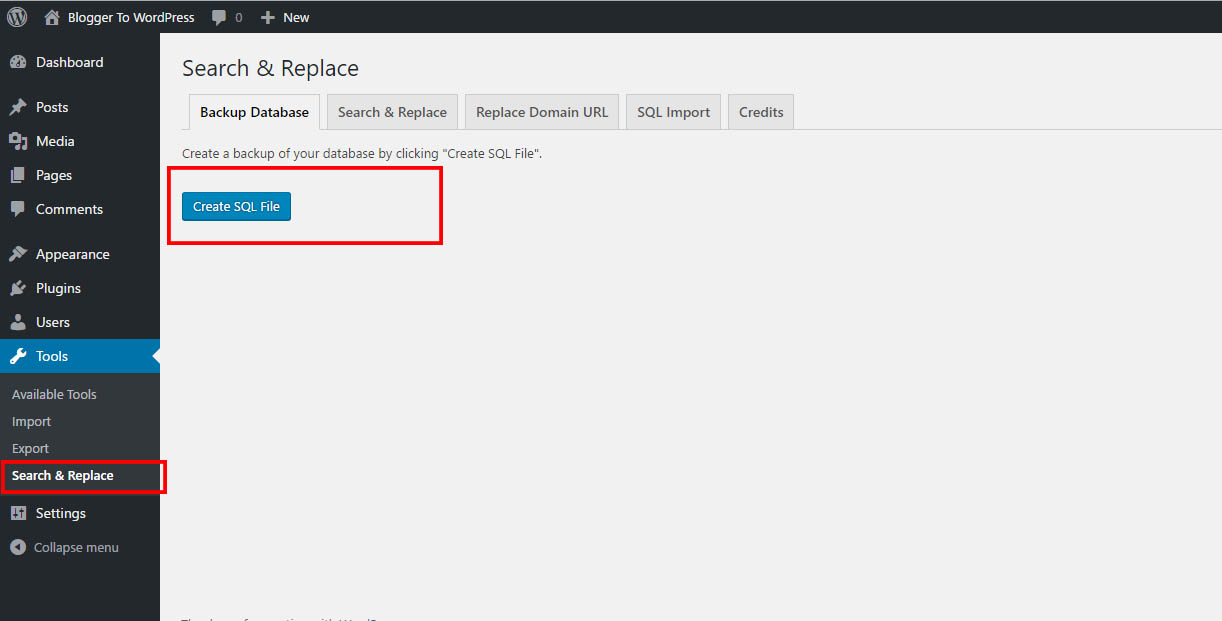
1, So click Create Sql File and download as shown below image.
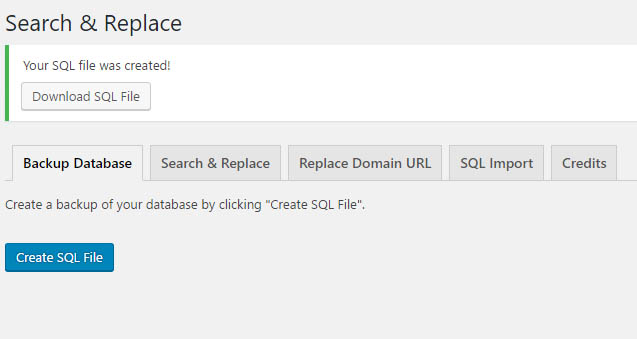
2, Download SQL file and save it in safe place. We can use it, if something went wrong during search and replace process.
3, Now select Search & Replace tab and enter search for as like this beta.yourdomain.com and replace with www.yourdomain.com as shown below
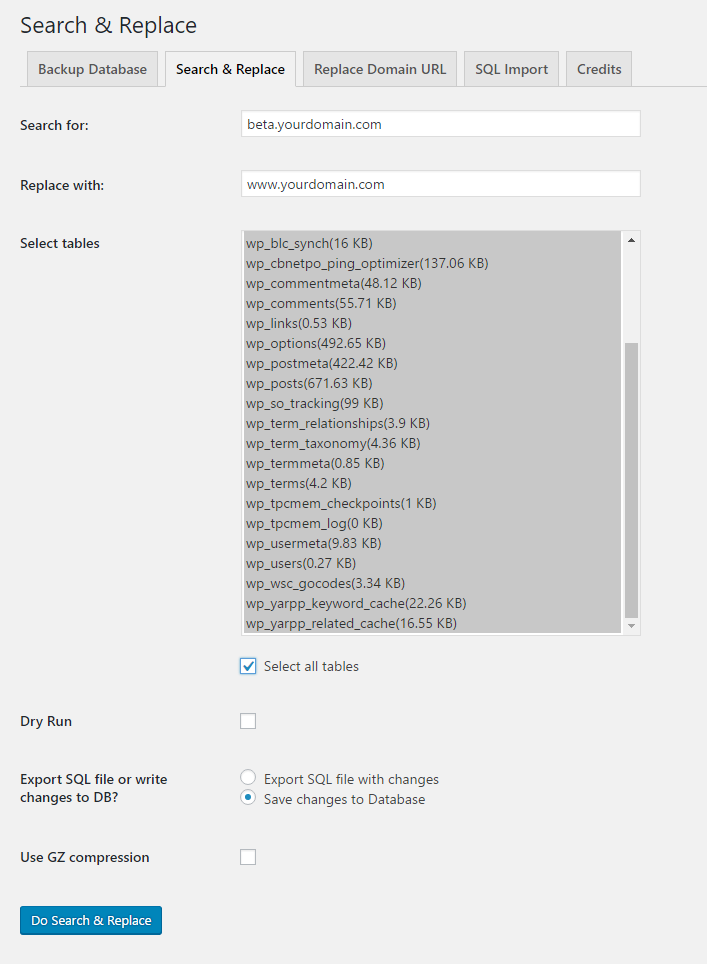
Make sure that you selected all tables, Disabled dry run and save changes to database option. And just click Do Search & Replace button.
After finishing all your temporary urls are now gone, all images and links now have only www.yourdomain.com version.
Now you can delete temporary sub domain to avoid duplicate content issues. Navigate to sub domain section of your host and just remove that sub domain. You just need to delete that sub domain only. Don't delete any files or any other settings.
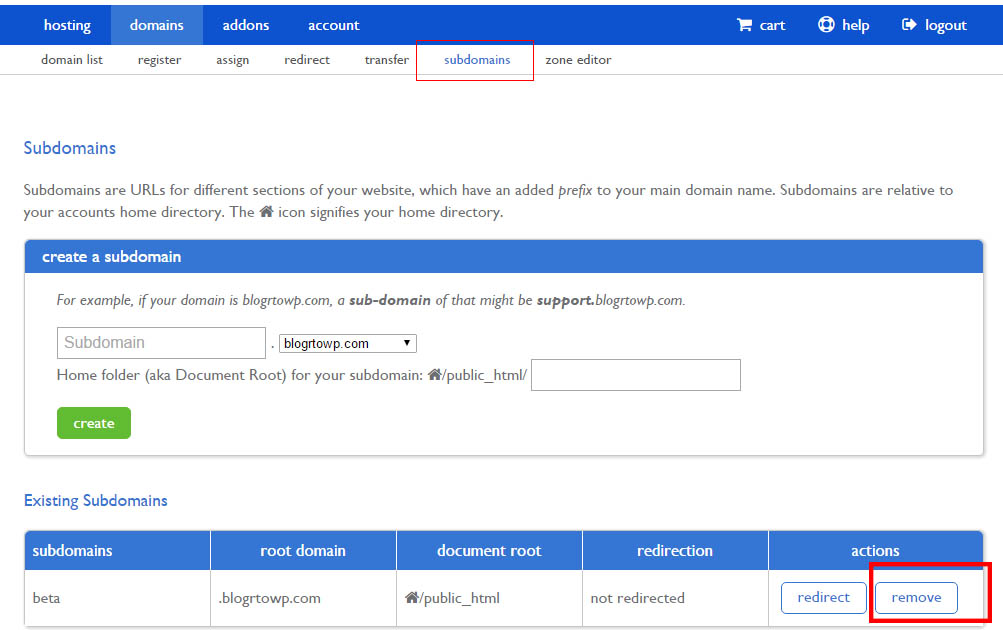 Confirm delete and continue.
7, Redirecting search labels, pages, archivs, and feed pages
This is the last step in your set up. This will work only in case of apache servers. For nginx servers it will be different. It is a bunch of .htacess code that you need to add in top of .htacess file of your hosting. This will automatically fix 404 issues of pages, search labels and other pages.
.htacess location will be root path of your domain in hosting where WordPress is installed.
#Redirect archives

RewriteRule ^([0-9]{4})_([0-9]{1,2})_([0-9]{1,2})_archive.html$ $1/$2/ [L,R=301]
#Redirecting labels
# remove spaces from start or after /

RewriteRule ^search/label/(.*/|)[\s%20]+(.+)$ tag/$1$2 [L]
# remove spaces from end or before /

RewriteRule ^search/label/(.+?)[\s%20]+(/.*|)$ tag/$1$2 [L]
# replace spaces by - in between

RewriteRule ^search/label/([^\s%20]*)(?:\s|%20)+(.*)$ tag/$1-$2 [L,R]
#let finish label redirect

RewriteRule ^search/label/(.*)$ tag/$1/ [R=301,L]
#Redirecting pages

RewriteRule ^p/(.*)\.html$ /$1/ [L,R=301]
#Rss feeds

RewriteRule feeds/posts/default feed [R=301,L]

RewriteRule rss.xml feed [L,R=301]
#Atom feeds

RewriteRule atom.xml feed/atom [L,R=301]
#Comments Feed

RewriteRule feeds/comments/default comments/feed [L,R=301]
#remove mobile url

RewriteCond %{QUERY_STRING} ^m=1$

RewriteRule ^(.*)$ /$1? [R=301,L]
Access your .htacess file using filezilla or using cpanel and modify it. You may need to make some slight changes to this code depending on the server. Most of apache servers supports this code. So no need to worry about it.
So you are done. Now your blog is 100% WordPress. If you would like to change link structure of blogs. Read this article. Change Permalinks After Moving from Blogger to WordPress.
8, Tutorial for Blogspot.com blogger users.
If you are not using custom domain for your blogger blog, you just have to follow only some steps in the above article.
PS: For this beta.yourdomain.com refers to www.yourdomain.com or yourdomain.com(If you installed WordPress without www).
After purchasing hosting for your blog, just follow this steps.
- : Install WordPress on your new web hosting using this guide
- : Follow step 2 in this tutorial: Setting up your newly created blog (Here your login url should be www.yourdomain.com/wp-admin/ where you installed WordPress in first step)
- : Importing contents from blogger blog to new temporary blog (After this step access your site using www.yourdomain.com to see if import is worked perfectly)
- : Search and replace temporary urls. (In this step you should use http://yourblog.blogspot.com search for and replace with http://www.yourdomain.com. Also skip sub domain removal section, which is not necessary.)
- : Redirecting search pages, labels, pages, archivs, and feed pages
- : Adding this small code snippet to htaccess. This is used as a method to redirect old blogspot.com urls to new domain. So add this code replacing yourblog.blogspot.com and www.yourdomain.com.
#Redirect old blogspot to new one

RewriteCond %{QUERY_STRING} ^id=http://yourblog.blogspot.com/(.*)$

RewriteRule ^url$ http://www.yourdomain.com/%1? [R=301,L]
Above code should write just after this line.
RewriteRule feeds/comments/default comments/feed [L,R=301]
Try this url in browser http://www.yourdomain.com/url?id=http://yourblog.blogspot.com/ if that lands you in http://www.yourdomain.com/ you are ready to go, please cross check some other urls as well like this .
http://www.yourdomain.com/url?id=http://yourblog.blogspot.com/2016/02/post.html will redirect you to http://www.yourdomain.com/2016/02/post.html
So you are ready to move to next step.
- : Making some small changes to your old blogspot blog.
In this step we are going to make some changes to blogspot.com blog. We will set a cross domain canonical url and a JavaScript redirect to your new blog.
Login to your blogspot blog admin panel and take template editor.
<b:include data='blog' name='all-head-content'/>
Search for this code and replace with this one, click the url to get access to it.
Download code
Now take any url in your blog, that will automatically redirect to your new blog.
Important Things to Remember
If you are using custom domain, ever used blogspot.com sub domain for this blog and created links to old blogspot blog url please follow step 8(Tutorial for Blogspot.com blogger users) That will avoid broken links to your blog from old blogspot urls. This is completely optional. You must disable custom domain option from blogger admin panel those who are following step 8.
Do you have the habit of changing article dates? Then you might face some issues after moving to WordPress. All those date changed urls will become broken links when coming from search and bookmarked links. So we recommend this article to redirect 404 urls and to get better urls.
Disclaimer
You must try this tutorial with your own risk. There is a chance of drop in ranking as well as traffic. In my experience ranking and traffic used to comeback after few days.
We will not be responsible for any lost after following this tutorial.
Conclusion
We tried my level best to write this article. Hope this is helpful. As a conclusion, this article is suited for those who are looking for blogger blog migration with or without custom domain.
Recommended web hosting services
We also offer free and premium migration services. Please contact us through this email [email protected] for more details.


PAWAN KUMAR
Skyafar Staff